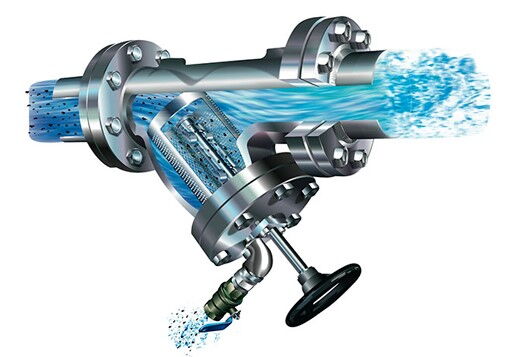
This article provides a comprehensive guide on the cleaning and maintenance of Y-type strainers, which are essential components in industries like chemical, petroleum, pharmaceutical, and food processing. It outlines the necessary preparatory steps, disassembly process, and the cleaning procedures for both the strainer screen and interior. Emphasis is placed on inspecting and replacing damaged parts, such as seals and gaskets, to ensure long-term performance. The article also covers the reassembly of the strainer, checking pipeline connections, and restoring system operation. A final inspection ensures the strainer's efficient performance in protecting downstream equipment by filtering impurities from pipeline fluids. Regular maintenance, following standard procedures and safety precautions, extends the lifespan of Y-type strainers and enhances the stability of the fluid system.
Y-type strainers are widely used in industries such as chemical, petroleum, pharmaceutical, and food processing. Their primary function is to filter out impurities in pipeline fluids, protecting the normal operation of downstream equipment. However, to ensure the efficient operation of Y-type strainers, regular cleaning and maintenance are required. This article provides a detailed explanation of the cleaning and maintenance process for Y-type strainers, along with important precautions during operation.
Before starting the cleaning and maintenance process, necessary safety preparations must be made to ensure operational safety.
Close Inlet and Outlet Valves: First, close the inlet and outlet valves connected to the Y-type strainer to stop the fluid flow. This prevents the risk of fluid leakage during cleaning and maintenance.
Release Internal Pressure: If there is pressure inside the strainer, release it by opening the exhaust valve or vent screw to avoid accidents during operation.
Prepare Tools: Gather the necessary tools, such as wrenches, screwdrivers, and socket wrenches, based on the strainer's model and structure.
When disassembling the Y-type strainer, gradually loosen the connecting bolts or nuts.
Loosen Connectors: Use a wrench or screwdriver to loosen the bolts or nuts connecting the Y-type strainer. Avoid using excessive force to prevent damage to the connectors or other issues.
Remove the Upper Cover: After loosening the connectors, the upper cover of the Y-type strainer can be easily removed. Ensure the strainer remains stable during this process to avoid damage caused by uneven force.
Remove the Strainer Screen: Once the upper cover is removed, take out the strainer screen inside the strainer and inspect it. If the screen is damaged or clogged, it needs to be replaced. If it is still usable, proceed with cleaning.
Ensure thorough cleaning of the strainer screen to remove all impurities.
Inspect the Strainer Screen: First, check if the strainer screen is damaged, clogged, or contaminated. If severe damage or irreparable clogging is found, replace the screen immediately.
Clean the Strainer Screen: If the screen is still usable, rinse it with clean water or an appropriate cleaning solution. Use a soft brush or compressed air to assist in cleaning, ensuring no residue or impurities remain on the screen.
Check Screen Precision: After cleaning, inspect the precision and quality of the screen to ensure it meets design requirements.
In addition to the strainer screen, the interior of the strainer also needs thorough cleaning.
Clean the Strainer Interior: Use clean water or a suitable cleaning agent to flush the internal channels of the strainer, removing any residual dirt and impurities.
Inspect Internal Components: Check other internal components, such as seals and support structures, for damage. Replace any worn or damaged parts promptly.
After cleaning, inspect the condition of all components to ensure the strainer can operate stably in the long term.
Replace Damaged Parts: If the strainer screen, seals, or other components are damaged, replace them with new parts. Ensure the replacement parts meet equipment requirements to maintain optimal performance.
Repair Sealing Gaskets: Inspect the sealing gaskets between the upper and lower covers and the connecting parts of the Y-type strainer. If aging or damage is found, replace them promptly.
After cleaning and replacing damaged parts, reassemble the Y-type strainer.
Install the Strainer Screen: Place the cleaned strainer screen back into the strainer, ensuring it is correctly installed and fully fits the strainer housing.
Install the Upper and Lower Covers: Reinstall the upper and lower covers of the strainer, ensuring the bolts or screws are securely tightened.
Check Connection Points: During installation, ensure all connectors are properly tightened to avoid water or air leaks during operation.
Before reinstalling the Y-type strainer, ensure the connected pipelines are not loose or leaking.
Inspect Pipeline Connections: Check the connection points between the pipeline and the strainer to ensure all joints are tightly secured, preventing water or air leaks.
Inspect Valves: Pay special attention to the sealing of the inlet and outlet valves, ensuring they are not loose or damaged. Address any leaks immediately.
After completing all cleaning and maintenance tasks, restore the normal operation of the strainer and the system.
Restore Fluid Flow: After confirming no leaks at all connection points, reopen the inlet and outlet valves to restore normal fluid flow.
Check System Operation: Start the system and observe the operation of the Y-type strainer, ensuring it functions properly and that the fluid passes through the strainer without abnormalities.
Restore Insulation Layer: If the Y-type strainer has an insulation layer, ensure it is restored after all work is completed to maintain the long-term stable operation of the equipment.
After the system is restored, conduct a final inspection and testing to ensure all components are installed correctly and the system operates smoothly.
Inspect Valve Conditions: Check all valve connection points to confirm there are no water or air leaks. Address any issues promptly.
Test System Performance: Monitor the system's operating parameters to ensure the Y-type strainer effectively filters impurities from the fluid and protects downstream equipment.
Y-type strainers play a crucial role in pipeline systems, and their cleaning and maintenance directly impact the stability and efficiency of the entire system. Through regular cleaning and maintenance, the long-term reliable operation of Y-type strainers can be ensured, reducing the risk of equipment failure. By following standard procedures, paying attention to safety details, and regularly replacing damaged parts during each cleaning and maintenance session, the lifespan of the strainer can be extended, ensuring the efficient operation of the fluid system.


